Stability Calculations
CATENARY METHOD
Past developments
An English engineer of the 17th century, Robert Hooke, made already in 1675 the correlation between the tensile stress in a chain and the compressive stress in an arch. This statement may have been made before, but nothing is certain without historical records.
Gaudi, the Spanish architect of the early 20th century, developed and used extensively this method which aims to define the shape assumed by a freely suspended chain. He studied very precisely the various loads applied on his arches and he always gave them pure catenary curves. The piers or columns, which support the arch, were also given the direction of the line of thrust.
Gaudi, the Spanish architect of the early 20th century, developed and used extensively this method which aims to define the shape assumed by a freely suspended chain. He studied very precisely the various loads applied on his arches and he always gave them pure catenary curves. The piers or columns, which support the arch, were also given the direction of the line of thrust.
 Iglesia Colonia Guell – Near the entrance |  Iglesia Colonia Guell – Inside |  Park Guell |
Works of Gaudi in Barcelona, Spain – All arches and columns follow LT which are catenary curves
Principle
| A board to conduct the catenary study is needed. The section of the desired arch is drawn reversed at a scale fitting on the study board and is stuck on it. A chain which has the length of the arch centre line is hung freely on the board. It will assume the curve of an undisturbed catenary. (See stability notions) The chain is then loaded with other small chains which represent the various loads needed to bring the line of thrust within the middle third of the arch. This curve will also be a catenary, but modified by the various loads applied on it. It represents the line of thrust. |
 Undisturbed catenary assumed by the chain hung freely on the board |  Modified catenary assumed by the chain loaded with various chains |
| The catenary method gives only the exact and ideal curve of the line of thrust, which represents the line of compressive stress in the arch. But it does not give the intensity of these forces. The funicular method is needed to determine the value of the forces acting in the arch. The catenary method requires a minimum of equipment. Note that the following list represents the basic equipment needed to start these kinds of study. The number of small chains and the number of links required may vary according to the size and kind of arch studied. |  Studying an arch on the study board |
• A white study board of about 1 m square. It is equipped with hooks, distant of 1 cm to hang the chain on.
• The study board should also allow one to fix the chains anywhere on it. It can be made with plywood to pin the chain on or with metal sheet to anchor the chain with magnets and hooks.
• A chain of 1 to 2 m length with links of about 1cm long.
Many small chains with various numbers of links.
• The study board should also allow one to fix the chains anywhere on it. It can be made with plywood to pin the chain on or with metal sheet to anchor the chain with magnets and hooks.
• A chain of 1 to 2 m length with links of about 1cm long.
Many small chains with various numbers of links.
Basic method
The method which is normally followed assumes that the arch/vault is free standing. It can have any shape, thickness or span but is studied alone and without any load on it. The various steps for this method are too detailed and therefore we can only illustrate here a few of them with graphics.
The number of links represents the weights which have to be added on the arch. The masonry, which is supposed to be built on the haunches, is most of the time not harmonious (fig. 4 below), and the study has to be pursued using the optimisation method.
2. Calculate the weights of all segments and define the centre of gravity (CG) of each segment.
3. Assume the horizontal thrust, HT’ and start the funicular diagram by tracing the resultant forces from HT’ to the various CGs. This will define an assumed line of thrust (LT’).
4. Once the first diagram with the assumed line of thrust is obtained, redo the diagram with the actual thrust (T) passing through the pivot of stability (I) and the exit point on the springer of the arch.
5. Redraw on the funicular diagram the resultant forces by joining HT and the various weights. This will define a new diagram which shows now the actual forces in the arch.
6. Transfer all the resultant forces of the actual funicular diagram onto the section of the arch. This will define the actual line of thrust, LT.
7. The line of thrust should remain within the middle third. In the example showed below, the arch is not stable and it will collapse because it is too thin.
1. Draw one half of the arch at the largest possible scale and divide it into short and preferably equal segments. Reverse the drawing on the board for the chain study.
2. Hang the chain which fits the length of the arch centreline and load the chain symmetrically with weights so as to get the chain in the middle third of the arch. Reference all segments.
3. Select the minimum thickness for the top of the arch. This minimum thickness will depend on the block size available.
4. Start the Funicular method as described above. This study is done with all the new measurements and weights obtained from the chain study for every segment.
5. After a few adjustments of the segments’ thickness the funicular diagram will work with an extrados having steps.
6. Smoothen the extrados and redo the funicular diagram until the arch becomes stable.
7. Determine up to which height the vault, which is created with this arch section, can be built with horizontal courses. For that moments have to be calculated.
8. Determine the bond pattern with the various sizes and types of blocks
The number of links represents the weights which have to be added on the arch. The masonry, which is supposed to be built on the haunches, is most of the time not harmonious (fig. 4 below), and the study has to be pursued using the optimisation method.
 1. Chain hung freely on the study board |  2. Chain loaded with small chains |  3. Segments with the number of links |  4. Theoretical weights with masonry They cannot be built like that |
FUNICULAR METHOD
Principle
Principle
A French engineer of the 19th Century, Mery, developed a funicular method to calculate the forces acting in an arch.
Half of the arch is drawn at a large scale and divided into short segments which are preferably of equal length. Their weights are calculated and the centre of gravity (CG) of each segment is defined. The vertical lines where the CGs is applied are also drawn.
The intensity of the horizontal thrust has to be evaluated in order to start the study. HT is the horizontal component of the line of thrust, and thus LT is horizontal on top of the arch.
HT is applied on top of the section of the arch and represents the balance of the second half of the arch. When HT encounters the line of the CG of the first segment, the direction of LT will change. The resultant force will encounter also the next line of the CG of the next segment and will change again direction. This goes on till LT encounters the last vertical line of the last CG. This final direction of the resultant will be the thrust T, and its angle and intensity will be known.
In fact, as HT was evaluated at once, LT will rarely remain in the arch and/or exit in the springer because it is not the actual line of thrust. The method described hereafter has to be followed to define correctly where LT passes in the arch and what the intensity of the thrust is.
Method
The various steps for this method are too detailed and therefore we can only illustrate here only the main steps with a few graphics.
1. Draw one half of the arch at the largest possible scale and divide it into short and preferably equal segments.2. Calculate the weights of all segments and define the centre of gravity (CG) of each segment.
3. Assume the horizontal thrust, HT’ and start the funicular diagram by tracing the resultant forces from HT’ to the various CGs. This will define an assumed line of thrust (LT’).
4. Once the first diagram with the assumed line of thrust is obtained, redo the diagram with the actual thrust (T) passing through the pivot of stability (I) and the exit point on the springer of the arch.
5. Redraw on the funicular diagram the resultant forces by joining HT and the various weights. This will define a new diagram which shows now the actual forces in the arch.
6. Transfer all the resultant forces of the actual funicular diagram onto the section of the arch. This will define the actual line of thrust, LT.
7. The line of thrust should remain within the middle third. In the example showed below, the arch is not stable and it will collapse because it is too thin.
 1. Half of the arch with segments and CGs. The resultant forces define LT’ and I | 2. Actual thrust of the arch. From the pivot of stability to the exit point on the springer |  3. Actual line of thrust The arch collapse because it is too thin |
Aim
This method has been especially developed for designing and building vaults without centrings (See Free Spanning technique). Nevertheless, the section of this optimal arch can also be used for building domes without centrings. Note that this method can be applied for building an arch only if the latter is built separate from a building and not integrated in a wall. If an arch has to be built in a wall, it does not need to be studied with this optimisation method.
This method combines the Catenary and Funicular methods for defining the optimal section of a desired arch. The lightest arch, which has the line of thrust within the middle third, will be the optimal section. An arch always induces a thrust, and the lighter the arch is the less the thrust is.
Note that the reduction of the horizontal thrust can also be a way to optimise the arch, but it will often induce extra weight due to the load needed on the haunches. Therefore, the arch becoming heavier will exert more thrust, though its horizontal component has been reduced. As the reduction of the horizontal thrust is detrimental to the weight and overall thrust, it is preferable to concentrate on the lightness of the arch.
Principle
The section of the desired arch is drawn reversed at a scale fitting on the study board, and is stuck on it. A chain, which has the length of the centre line of the arch, is hung freely on the board and will assume the curve of a catenary. It is then loaded with other small chains, according to the Catenary method. These various loads will bring the line of thrust within the middle third of the arch.
The number of links of the chain and the various loads applied on it are converted into weights. These are then materialised as masonry by segments of varying thickness.
The smallest thickness near the apex has to be defined. The study will give, after several adjustments, the ideal section so as to obtain the lightest arch, according to its span and shape. Once the lightest arch has been obtained with the Funicular method, the masonry pattern can be determined.
Method
This method starts with the same process as the Catenary method. It integrates also the Funicular method and other particular studies. The various steps for this method are too detailed and therefore we can only illustrate here only the main steps with a few graphics.
1. Draw one half of the arch at the largest possible scale and divide it into short and preferably equal segments. Reverse the drawing on the board for the chain study.
2. Hang the chain which fits the length of the arch centreline and load the chain symmetrically with weights so as to get the chain in the middle third of the arch. Reference all segments.
3. Select the minimum thickness for the top of the arch. This minimum thickness will depend on the block size available.
4. Start the Funicular method as described above. This study is done with all the new measurements and weights obtained from the chain study for every segment.
5. After a few adjustments of the segments’ thickness the funicular diagram will work with an extrados having steps.
6. Smoothen the extrados and redo the funicular diagram until the arch becomes stable.
7. Determine up to which height the vault, which is created with this arch section, can be built with horizontal courses. For that moments have to be calculated.
8. Determine the bond pattern with the various sizes and types of blocks
 1. Decreasing loads towards the apex |  2. Reference all segments | 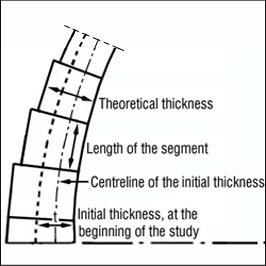 3. Segments measurements |  4. Extrados with steps |
 5. Smooth extrados |  6. Calculating the moments for a vault |  7. Division of the segment by the block height |  8. Define the block sizes and masonry pattern |
 9. Define the block sizes and masonry pattern Dimension whatever is needed for the execution |  10. Details of the masonry pattern |  11. Semicircular vault studied with the optimisation method and built free spanning |
NEUTRALISATION OF THE THRUST
Once all the actual forces are defined it is seen that the arch is stable, it is possible to design the elements which will counter-balance the thrust. Concrete ring beams are often the best and easiest ways to neutralize the thrust of domes, and steel truss rods to counter balance the thrust of vaults.
Small arches in a wall
Arches of small size are most of the time part of a wall and used to span openings such as windows or doors. Therefore the wall will act as a buttress and balance the thrust. We have seen that the angle and intensity of the thrust will vary according to the type of arch. Therefore, segmental arches will exert more stress on the wall, which will need to be longer on both sides of the arch.Two cases can be considered:
Large arches
| 1. The arch is located in a wall. The weight of the wall masonry will counteract the thrust and no study needs to be conducted. |  Segmental arch centred in a long wall |
| 2. The arch is located near a corner. Depending on the arch, the thrust may disturb the stability of the wall. A funicular study has to be conducted to check if the weight of the wall masonry can counterbalance the thrust. |  Segmental arch in a corner |
| The above diagram, with the arch in the corner of the wall, shows that the segmental arch is too close to the corner of the wall and the latter will crack. Two ways to solve the problem are shown hereafter: |
|
 1. Change the shape of the arch in the corner |  2. Move the arch away from the corner |
| Arches of a larger size may not have a sidewall to balance their thrust. Therefore the pier should be wide enough to prevent collapse. The stability principle should be respected and a funicular study conducted to check the balance of the thrust. The drawing beside shows that the pier is not wide enough and will collapse. Two ways to balance the thrust are possible, as show on the right side. |  Pier not wide enough for a large arch  1. Change the angle of the roof for a large arch |  2. Add a buttress for a large arch |
Vaults
Pay attention to how the bending moments behave for both cases of beams or ring beams. Truss rods are most of the time placed at regular intervals and therefore the bending moments will be inverted. Thus the bending moments and shear stresses of the beams will be calculated accordingly.
Square domes
Square domes are generated by the intersection of vaults. Therefore the forces involved will be similar to those of the vaults generating the dome.
The four sides of the ring beam will be stressed by a combination of bending moment and tensile stress, which is equivalent to the thrust happening in the truss rod.
If truss rods are to be used, their details should be studied following the same principle as for vaults. The ring beam calculations (inertia bending moments and shear stresses) will also be made similarly to the vaults. Note that the dome being square, care should be taken at the junction of the beams, especially for the anchorage of the rods in the corner.
The thrust of vaults can be balanced by means of piers, buttresses and truss rods. The stability principle of be respected. If the neutralisation of the thrust has to be done with only abutments, the force taken into account for the width calculation of the abutment is HT. The case taken as an example here is a vault resting on a beam or ring beam, which is balanced by a truss rod.
Beams and ring beams are generally made of reinforced cement concrete (RCC). Truss rods are generally made of mild steel. Once the stability study is completed and forces are known, the truss rod and beam or ring beam can be calculated using conventional methods. When a vault rests on a beam which spans an opening, the thrust is composed of a horizontal component and the weight, so the beam should be calculated to withstand both forces. When a vault rests on a ring beam which does not span any opening, only the horizontal thrust has to be taken into account for the calculation of RCC. |  Forces applied on a beam | 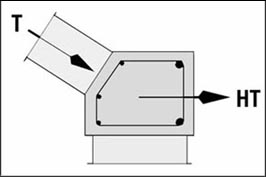 Force applied on a ring beam |
 Types of moment applied on the beams or ring beams |
||
Pay attention to how the bending moments behave for both cases of beams or ring beams. Truss rods are most of the time placed at regular intervals and therefore the bending moments will be inverted. Thus the bending moments and shear stresses of the beams will be calculated accordingly.
Square domes
The four sides of the ring beam will be stressed by a combination of bending moment and tensile stress, which is equivalent to the thrust happening in the truss rod.
If truss rods are to be used, their details should be studied following the same principle as for vaults. The ring beam calculations (inertia bending moments and shear stresses) will also be made similarly to the vaults. Note that the dome being square, care should be taken at the junction of the beams, especially for the anchorage of the rods in the corner.
Circular domes
| We have seen that a dome is the section of an arch which rotates on itself and therefore can be assimilated to an infinite number of arches that are radiating from the centre of the dome. It is possible to evaluate with the following method the peripheral tension, which tends to open the wall supporting the dome, and to determine the size of the circular truss rod. The forces acting in the theoretical arch section should be evaluated with the optimization method. The values for the horizontal thrust (HT), the weight (W) and the thrust (T) will be determined as well as the angle of the thrust on the springer. |  Radiating forces of the theoretical arches |