Stabilised Rammed Earth Foundations
This type of foundations is used in Auroville since 1990 for all kinds of buildings, up to 4 floors high. The soil is excavated from the trench foundation. It is sieved and then measured at the same time on the side of the trench. Sand always needs to be added. In Auroville, we use always 5 % by weight of cement and the mix is as follow: 500 litres soil + 200 litres sand = 1 bag cement (50 Kg). Note that mix is only for Auroville soil and it has to be adapted to every situation regarding the soil quality and the local requirements. The principle is that the mix should be calculated for 1 bag of cement per mix.
A team is composed of 4 workers who dig, sieve and measure the soil, add the various components, mix and ram. This team of 4 people can do about 2 m3 per day of stabilized rammed earth foundation rammed in situ (including measuring the components, mixing and ramming). These foundations are the cheapest that we can do in Auroville.
Usually the top level of the foundation is at the level of the original ground. The section of the foundation should normally be square. It is essential that it is not wider than deeper, as the load of the wall will create a pointed load and the foundation could not bear it. As an example, a foundation of 80 cm wide x 50 cm deep will not work and it may break under the load of the building. On the opposite side, it is not a problem to go deeper and to obtain a foundation deeper than wider. This is the case when the ground does not have the proper load bearing capacity at the required depth and one has to dig deeper. As an example, it will be OK to have a foundation of 1.5m deep and 75 cm wide.
As a thumb rule, these sections can be used according to the building type:
PROCEDURE
| One-floor building:50 x 50 cm | Two-floor building:60 x 60 cm | Three-floor building:75 x 75 cm | Four-floor building:90 x 90 cm |
PROCEDURE
1. Remove carefully the top soil on the entire site. Stack it in a corner of the site as it can be reused later on for landscaping.
2. Mark very accurately the foundations. It is important to mark exactly the proper width of the trench because if the trench is too wide some stabilized mix will be wasted for filling it up.
3. Prepare some references for the top level of the plinth with blocks laid on each other or some wooden pieces (batter boards) before starting to dig.
4. Start to dig very accurately the foundations required (with, length and depth).
5. Don’t move away the soil excavated. Throw the soil onto the sieve placed on top of the frame, which is laid at around 2 m from the trench.
6. Once the frame is filled, remove the sieve and level properly the soil in the frame to get the exact volume desired.
7. Lift the frame. Move it further and proceed in the same way.
8. Before the foundation is fully excavated, a mason will mark with a tube level, at each corner, the top level of the foundation.
9. Add the sand required on every pile of soil and 1 bag of cement.
10. Once all the trenches have been excavated, start to mix the piles soil, sand and cement dry first to get a uniform colour and homogeneous mix. It has to be mix at least 2 times.
11. Add water to get the optimum moisture content (same as for compressed earth blocks) and mix it again 2 or 3 times.
12. Pour back the mix in the trench: 12 cm per course. Level the layer and check in many places the height of this layer with the layer gauge.
13. Start ramming with a large rammer (200 cm2) and then with a smaller one (100 cm2). Ram till a clear sharp sound is heard and the rammer is not printing anymore the layer.
14. Check in various places with the pocket penetrometer. It should not penetrate more than 6 mm with the pocket penetrometer from the Auram equipment (under 5 kg/cm2 pressure).
15. Once the entire course is completed, sprinkle some water on the previous course and proceed further in the same way for the next layers.
16. If in case it is not possible to complete a course in a day, create steps with the next layers so that an overlap will be created. The length o the step is the same width as the foundation.
17. Once the foundation is almost complete, check the level of the top layer with a string line, from mark to mark laid by the mason, and ram accordingly.
18. When the last course is completed, check again the level of the top layer with a string line, from mark to mark laid by the mason, and scrape the top if in case it is too high.
19. If in case the top level is slightly depressed by 1 to 3 cm in some points, don’t fill them, as rammed earth cannot be rammed so thin. The mortar for the first course of the basement will fill it up.
20. Cure the foundation for 4 weeks if the basement can’t be done straight away. Otherwise the curing of the basement and walls will do.

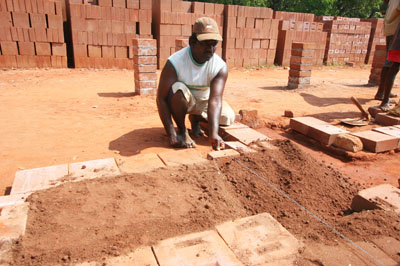
Digging the trench and sieving the soil in the frame
|

Levelling the soil in the frame to get 500 litres
|

Lifting the frame
|

500 litres of soil sieved from the trench
|

Marking the top level of the foundation with a water level
|

Mark for the top level of the foundation
|

Adding 200 litres of sand on the pile of soil
|

Adding 1 bag of cement (50 Kg)
|

Mixing first dry (minimum 2 times)
|

Adding water and mixing 2 or 3 times wet
|

Sprinkling water on the previous course
|

Pouring the stabilised earth mix in the trench
|

Pouring the stabilised earth mix in the trench
|

Checking the thickness of the course (12 cm)
|

Adjusting the thickness of the course (12 cm)
|

Ramming first with a large rammer (200 cm2)
|

Ramming with a smaller rammer (100 cm2)
|

Ramming the foundation
|

Checking the quality with the pocket penetrometer
|

Penetrometer should not go in more than 6 mm
|

Sprinkling water on the previous course
|

Ramming to get a step (to finish a course)
|

Ramming to get a step (to finish a course)
|

Steps as wide as long for overlapping the courses
|

Checking the thickness of the course (12 cm)
|

Adjusting the thickness of the course (12 cm)
|

Ramming to get a step (to finish a course)
|

Laying some blocks as formwork when the top level of the foundation is higher than the ground (site with a slight slope)
|

Ramming the last course
|

Filling the last course
|

Levelling the last course
|
Checking the level of the last course
|

Ramming the last course
|

Scraping the top of the last course after checking with the string line
|

Checking the top level of the foundation from the reference level
|

Slight ramming of the top layer after having it scraped
|

Section of stabilised rammed earth foundation & composite plinth beam
|